What Happens During a Septic Drain Field Installation?
Last updated: September 10, 2026
Key Takeaways
- Typical trench depth is often around 18 to 36 inches to the bottom of the stone bed or chamber, but the permit controls the real number.
- What affects the price most: Soil conditions.
- Ask what happens if the installer hits groundwater or ledge before reaching planned depth.
- A good contractor should also tell you what is not included.
A septic drain field installation is where wastewater begins its trip through the soil, and the work is mostly careful layout, proper digging, and protecting the ground’s ability to absorb effluent. Short version? The installer should check the site, size the field for the house and soil, excavate without smearing or overcompacting the ground, place the distribution piping and stone or chambers, then test the system before backfilling. For what happens during septic drain field installation?, a qualified installer should follow the approved design and local code, with site conditions driving the final layout. The EPA’s homeowner guidance and state septic manuals both stress that local rules control the work.
Who this applies to, and what I’m assuming you already know

This is for a homeowner or property manager dealing with a failed drain field, a new build that needs a septic system, or a replacement field after a tank has already been set. I’m assuming you already know the drain field is not the septic tank. The tank separates solids; the drain field, also called the leach field or soil absorption system, handles the liquid effluent after the tank. What happens during septic drain field installation? The answer depends on how the system is designed, but it always involves moving clarified effluent into soil that can receive and treat it.
I’m also assuming you’re weighing whether to hire someone and what the process should look like once they start. A drain field is not a “dig a few trenches and be done” job. Soil type, groundwater, setbacks from wells and property lines, frost depth, slope, and local health department rules all change the layout. In many places, the permit and design are not optional. In others, the county will want a soil evaluation or perc test before any trench is cut. According to the EPA and many state health departments, these site checks are part of sizing a drain field correctly.
This is a job where a bad installation can fail quietly at first and then turn expensive. If the site has a high water table, bedrock near the surface, severe slope, or a history of wet spots, consult a licensed septic professional before work begins. The digging can be done with common equipment, but the design, sizing, and final approval usually need a contractor who works under local septic regulations and knows the soil conditions in your area. North Carolina State Extension and the EPA both note that unsuitable site conditions often call for a modified or engineered system.
If you are in a frost-prone area or a place with clay-heavy soil, the details matter even more. A field that works in sandy loam with 4 feet of usable soil cover may be wrong for a site with only 18 inches of suitable soil. Not a small difference. It changes whether the system functions at all. A septic drain field installation should therefore be matched to the available soil depth, not to a generic yard layout.
What actually gets installed in a septic drain field?
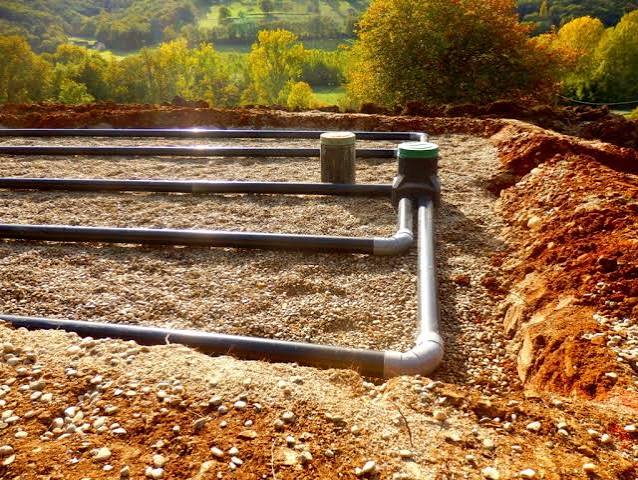
A septic drain field is a network of trenches or beds that lets clarified wastewater move from perforated pipe into prepared soil. The common terms are worth keeping straight: effluent is the liquid leaving the tank, distribution piping is the perforated pipe that spreads it, and aggregate means the washed stone that surrounds pipe in a conventional trench system. For what happens during septic drain field installation?, these parts are assembled so the soil can do the treatment work.
In a standard gravity-fed layout, the installer builds 2 to 6 trenches, often 18 to 36 inches wide, though the local design may call for different dimensions. The trenches are laid level or with a very slight slope depending on the design. The idea is not to flush wastewater downhill fast; it is to spread it evenly so the soil can accept and treat it. Consult the approved design, because some systems use pressure distribution or chambers instead of a basic gravity trench.
A lot of homeowners picture the drain field as “the pipes underground.” It is more than that. It is the trench shape, the stone or chamber system, the soil above and below, the manifold or distribution box if the design uses one, and the way the field is graded after installation. Miss one part by only a few inches, and the system can load unevenly while the first trench fails and the others still look fine. The EPA notes that uneven loading can shorten system life and increase maintenance needs.
The soil is the filter. Sandy ground can move water too quickly if the field is overbuilt; clay can hang onto water so long that the lines back up. That is why local design is often based on soil percolation or soil morphology, not on a one-size-fits-all layout. The National Onsite Wastewater Recycling Association and many state health departments publish design guidance for exactly this reason, and the EPA explains that drain field sizing is tied to soil treatment capacity.
How a septic drain field installation usually happens

A septic drain field installation starts with layout and ends with a protected, tested soil treatment area, and the work usually follows a sequence that takes 1 to 5 days for the field itself, not counting permits or design approval. The exact schedule depends on weather, access, soil conditions, and whether the old field must be removed first. What happens during septic drain field installation? In most cases, the installer stakes, excavates, sets the piping, and backfills in a controlled sequence.
- Confirm the approved design and stake the field. Before a shovel goes in the ground, the installer should set trench lines, elevations, and setbacks from wells, property boundaries, buildings, and drainage features. The key numbers come from the permit or site plan, often including trench length, spacing, and depth. Verify that the staked field matches the approved plan exactly. A problem shows up when the layout drifts closer to a well, a driveway, or a slope than the permit allows.
- Protect the soil from compaction. Heavy equipment should stay off the actual absorption area as much as possible, and the topsoil should be stripped and stockpiled with care. In many cases, the installer will work from the edge with a small excavator or track machine. Verify that the field area is not being churned into ruts. A problem is shiny, smeared trench walls or packed soil that will not absorb liquid well.
- Excavate the trenches to the designed depth. Typical trench depth is often around 18 to 36 inches to the bottom of the stone bed or chamber, but the permit controls the real number. The bottom should be level and uniform, not gouged. Verify depth with a laser level or transit, not a guess. A problem is uneven trench bottoms, which send more flow to one end and shorten field life.
- Prepare the base without overworking it. The base should be trimmed clean, not compacted smooth like a driveway. In conventional systems, washed stone is placed to a specified depth, often several inches beneath and above the pipe. Verify that the stone is clean and uniform, not full of fines or broken concrete. A problem is muddy stone, which can clog soil pores and reduce drainage.
- Set the distribution piping or chambers. Perforated pipe is usually laid with holes oriented correctly, and chambers are installed according to the manufacturer and design. Pipe should be aligned so flow distributes evenly across the trench length. Verify pipe slope is within the design tolerance, often only a slight pitch or level depending on the system. A problem is a line that sags, reverses slope, or points too much flow to one end.
- Install distribution hardware, if the design uses it. A distribution box, drop boxes, or manifold may be used to split flow among trenches. These parts must sit level so one trench does not get overloaded. Verify the box is level and the outlets are balanced. A problem is one outlet running lower than the others, which sends most wastewater into a single line.
- Cover with geotextile or approved separator, then backfill. Some systems use fabric over stone to keep soil from migrating into the aggregate. Backfill should be placed carefully in lifts, not dumped from height. Verify the cover material matches the design and the backfill is not burying access points or crushing chambers. A problem is thick clay backfill pressed into the stone bed, which can clog it early.
- Test flow and inspect for settlement. The installer should check that effluent would move evenly and that no trench settles immediately after backfill. If the tank and field are being commissioned together, the system may be filled and observed per local requirements. Verify that access risers, inspection ports, and cleanouts remain visible and usable. A problem is sinking soil, wet spots, or a strong sewage odor right after installation.
The hard part is usually not the digging. Keeping the field level, open, and undamaged from the moment soil is exposed until the last inch of backfill is placed—that is where rushed jobs fail.
What should a good installation cost, and what changes the price?
A septic drain field installation usually costs more when the soil is poor, the access is tight, or the existing system has to be removed first, and the price can swing a lot because local conditions drive the work. I’m not going to pretend there is a universal number. The honest answer is that the quote should be driven by trench length, soil treatment area size, excavation difficulty, permits, engineering, and whether the system is conventional, chamber-based, or more specialized. EPA homeowner guidance and state permitting documents both show that local conditions, not national averages, determine the real price.
What affects the price most:
- Soil conditions. Clay, shallow bedrock, or a high water table can require a larger field, elevated bed, or alternate design.
- Field size. A larger household flow or a restrictive soil evaluation usually means more trench footage.
- Access. If a machine has to work around trees, fences, septic components, or a narrow side yard, labor goes up.
- Replacement versus new install. Replacing a failed field often means demolition, soil remediation, and extra disposal.
- Code requirements. Some areas require engineered plans, inspections, or specific materials.
For a quote, I would ask for a line-item estimate that separates design, permit handling, excavation, materials, and restoration. If the contractor only gives one number and refuses to explain what it includes, that is a warning sign. Ask whether the estimate covers a distribution box, chambers or stone, risers, and final grading. Ask what happens if the installer hits groundwater or ledge before reaching planned depth. A written quote should also note whether the contractor will consult the local health department if the design has to change.
A good contractor should also tell you what is not included. Turf repair, tree removal, pumping the tank, or replacing collapsed plumbing may be separate. That honesty matters more than a low headline price. If the job is unusually cheap, I would want to know what they are skipping. For what happens during septic drain field installation?, exclusions are just as important as the base price.
What are the most common mistakes, and what do they cost?
The most common mistakes are design mistakes, not shovel mistakes, and they usually shorten the life of the field by forcing wastewater into the wrong part of the soil. A drain field can look neat on day one and still be wrong.
-
Building the field too small. The consequence is hydraulic overload, which means the soil cannot accept effluent fast enough. The correct alternative is to size the field from the approved design and the actual household flow, not from available yard space.
-
Compacting the absorption area. The consequence is reduced permeability. Track marks, repeated driving, and smeared trench bottoms can prevent the soil from breathing. The correct alternative is to keep heavy equipment off the field and use narrow access routes.
-
Uneven trench bottoms or pipe slope. The consequence is one trench taking too much water while another stays underused. The correct alternative is to check elevation with a level or transit at every trench.
-
Using the wrong backfill or stone. The consequence is fine material migrating into the system and clogging it. The correct alternative is washed aggregate and approved separator material if the design calls for it.
-
Ignoring groundwater or bedrock. The consequence is effluent moving too close to the surface or bypassing proper soil treatment. The correct alternative is to modify the design for site conditions, which may mean an elevated or alternative system.
-
Failing to protect access points and inspection ports. The consequence is a system that cannot be checked or maintained without digging it up. The correct alternative is to keep risers and cleanouts visible and easy to reach.
A bad installation often shows itself through early settling, chronic wet spots above the field, sewage odor, slow drains inside the house, or unusually green grass over one trench. Those signs do not prove the field is doomed, but they do mean something was built or connected wrong. What happens during septic drain field installation? If the installation was done correctly, these symptoms should be avoided by matching the design to the site and by keeping the field protected during backfill.
When should the standard approach change?
The standard trench-and-stone approach changes when the soil, slope, water table, or local rules make it a poor fit, and this is common enough that I would treat it as normal, not exceptional. A lot of generic advice assumes every yard can take a conventional gravity field. That is not true. Consult a septic designer or local health department before changing the layout, because the approved fix depends on the site.
If the site has shallow bedrock or a restrictive layer within about 24 to 36 inches, the field may need to be raised, moved, or redesigned because there is not enough treatment depth. If the site has seasonal groundwater close to the surface, the design may require additional vertical separation from the water table, which often rules out a simple shallow trench.
If the lot is steep, the field may need stepped trenches, contour layout, or pressure distribution so each line gets even flow. Gravity alone can overload the lower end. If the soil is very clayey, the design may need longer absorption area or an alternative treatment method. If the property is small or irregular, the field may have to be split into zones to fit setbacks and preserve access.
There are also older systems with distribution boxes, mound systems, chambers, or drip distribution. Those are not upgrades in the marketing sense; they are responses to site limits. A mound system, for example, builds above native soil when there is not enough usable depth below. That is a bigger visible structure, but it may be the only legal and functional option. EPA guidance and state manuals both describe these alternatives for difficult sites.
This is the part of the job where local rules matter most. A design that passes in one county may fail in the next because the soil standards, setback distances, or inspection requirements differ. What happens during septic drain field installation? The standard answer changes with those rules, so the installer should confirm the approved method before excavation starts.
How long does the job take, and what does a good result look like?
A good septic drain field installation usually takes one to several days for excavation and placement, but the total timeline can stretch from permit approval to final inspection over weeks, especially if soil testing or an engineered plan is needed. The field itself may go in quickly; the paperwork and site prep often take longer. In many jurisdictions, the permit and design stage can take several business days to several weeks before excavation begins.
A good result looks tidy but not over-finished. The trenches are straight or laid exactly to the design. The field area is graded so water sheds away from it, but the area is not compacted into a hard pad. The access ports are visible. The tank outlet, distribution hardware, and piping connections are protected and inspectable. Most importantly, the contractor can explain why the field was placed where it was and how the soil conditions drove the design.
I would be suspicious of a job that looks like a landscape project more than a utility installation. Excessive machine traffic, worn-out soil structure, or hidden access points can cause problems later. If you want to know what happens during septic drain field installation? A well-done job should end with a field that is level, protected, and easy to inspect.